Showing posts with label C#. Show all posts

Thursday 20 October 2011

How to Spy On a Windows Program: Tracking Main Window Activation

In this article I will walk you through the creation of a sample program that, each time I use any application on my pc, will record the application name, window title and time. While I do this, I will touch on techniques that, used for evil in spyware, are also applied with noble goals in areas like time tracking, application monitoring and computer-aided learning.
Practical information about this subject is hard to find. So, if you have ever been curious about how spyware programs work, how you can keep tabs on what a user does on a computer or how applications behave, read along.

Windows Architecture

To understand how you can “spy” on a running Windows program,  you first need to be familiar with the concept of event-driven applications.

Unlike applications that make function calls to obtain user input, Windows-based applications are event-driven. This simply means that they wait for the system to pass input to them.

The system passes all input for an application – for example, when the user types, moves the mouse, or clicks a control such as a scroll bar – to the various windows in the application. This input is passed in the form of messages. Besides the system, other applications can also generate windows messages.

If we could somehow inspect this message traffic, then we would have a way to know what it is that the system or other applications are asking any application to do. This is where you can put Windows Hooks to good use.

Windows Hooks

The MSDN documentation defines a hook as a point in the system message-handling mechanism where an application can install a subroutine to monitor the message traffic in the system and process certain types of messages before they reach the target window procedure.
There are different types of hooks, each providing access to different aspects of the system’s message handling mechanism. For example, keyboard hooks allow you to monitor keyboard messages (keyloggers make use this type of hook), mouse hooks allow you to monitor mouse messages and WindProc hooks allow you to monitor all messages processed by the Window Procedure, the message handling function in any window.

Armed with this knowledge, let’s go back to my sample program.

Tracking Window Activation

We know that when an application window becomes active, it is because the system sent it a message asking it to do so. Then, a way to track application usage is to install a system-wide hook that will inspect the messages the system sends to any application asking it to activate its main window.

To write my sample program I used C#, and to save time used an excellent Windows Hooks library written by Chris Wilson. In my sample program this is what I do:
  1. Install a global Shell hook. This type of hook allows me to intercept the messages sent by the system when a top-level window is activated.
  2. Upon intercepting a message indicating a top-level window activation, I record the time, the name of the application the window belongs to and the text displayed in the window’s title bar.
Sounds good? Let’s look at each step in detail.

The sample program is a Windows Form application with just one form.


Thanks to the excellent hooks library I am using (you can read more about it at The Code Project), all I need to do to be able to intercept top-level windows activation messages is subscribe to the WindowActivated event and install my shell hook. I subscribe to the event right inside the constructor for my only form.


public Form1()
{
InitializeComponent();
// Instantiate our GlobalHooks object
hooks = new GlobalHooks(this.Handle);
hooks.Shell.WindowActivated +=
new GlobalHooks.WindowEventHandler(hooks_ShellWindowActivated);
}
The hook is installed and uninstalled by pushing the “Start Monitoring” and “Stop Monitoring” buttons.
private void button1_Click(object sender, EventArgs e)
{
hooks.Shell.Start();
}
private void button2_Click(object sender, EventArgs e)
{
hooks.Shell.Stop();
}
Once the hook is installed, the message handling function of my form will start receiving not only messages directed to it, but also the messages intercepted by the shell hook.
Shell hooks intercept a variety of messages. Since I am just interested in top-level windows activations, I forward the messages to a utility function in the hooks library, which filters them and fires the WindowActivated event when the intercepted event indicates a top-level window activation.
protected override void WndProc(ref Message m)
{
// Send the messages to the library for filtering.
if (hooks != null)
hooks.ProcessWindowMessage(ref m);
base.WndProc(ref m);
}
Within the WindowActivated event handler, I use the window handle contained in the event arguments to lookup the application name and the window caption. Then I just display them in a listbox, together with the time the window was activated.
private void hooks_ShellWindowActivated(IntPtr Handle)
{
// Insert information at the top of the list.
listBox1.Items.Insert(0,"");
listBox1.Items.Insert(0, "Window caption: " + GetWindowCaption(Handle));
listBox1.Items.Insert(0,"Application: " + GetModuleName(Handle));
listBox1.Items.Insert(0,string.Format("Time: {0}", DateTime.Now.ToLongTimeString()));
listBox1.Items.Insert(0, "Window activation!");
}
You might have noticed how once you know when a top-level window was activated it becomes really easy to compute the time any application was actively used. I will leave the exercise to you.
Grabbing the window’s caption is accomplished with a call to the GetWindowText API function.
[DllImport("user32.dll")]
private static extern int GetWindowText(IntPtr hWnd, StringBuilder title, int size);
private string GetWindowCaption(IntPtr Hwnd)
{
// This function gets the name of a window from its handle
StringBuilder caption = new StringBuilder(256);
GetWindowText(Hwnd, caption, 256);
return caption.ToString().Trim();
}
Obtaining the application’s executable name is a a little more involved, yet easy.
[DllImport("user32.dll", SetLastError = true)]
public static extern uint GetWindowThreadProcessId(IntPtr hWnd,
out uint lpdwProcessId);
[DllImport("kernel32.dll")]
public static extern IntPtr OpenProcess(ProcessAccessFlags dwDesiredAccess,
[MarshalAs(UnmanagedType.Bool)] bool bInheritHandle, uint dwProcessId);
[DllImport("psapi.dll")]
public static extern uint GetModuleFileNameEx(IntPtr hProcess,
IntPtr hModule, [Out] StringBuilder lpBaseName,
[In] [MarshalAs(UnmanagedType.U4)] int nSize);
[DllImport("kernel32.dll", SetLastError = true)]
public static extern bool CloseHandle(IntPtr hHandle);
private string GetModuleName(IntPtr Hwnd)
{
uint processId = 0;
GetWindowThreadProcessId(Hwnd, out processId);
IntPtr hProcess = OpenProcess(ProcessAccessFlags.QueryInformation |
ProcessAccessFlags.VMRead, true, processId);
StringBuilder FileName = new StringBuilder(256);
GetModuleFileNameEx(hProcess, IntPtr.Zero, FileName, 256);
CloseHandle(hProcess);
return FileName.ToString().Trim();
}
And that is it. I hope you found the topic interesting and the sample useful. Here’s the source for the sample: HooksSample

Retrieving the Operating System Idle Time, Uptime and Last Input Time

Download this project (Visual Studio 2005)


In this C# programming tutorial here at Geekpedia, we're venturing into unmanaged code again. It's the popular user32.dll that has the GetLastInputInfo() function which interests us in this tutorial. The application will work with Windows 2000, XP, Server 2003, Server 2008 and Vista.

Start by creating a form with 3 Labels: lblIdleTime, lblSystemUptime and lblLastInput. Also add a Timer tmrIdle. Set the Interval property to 1000 (1 second) and the Enabled property to True. Every time this timer ticks, we'll check the last input time and the system uptime. Thus setting the timer to tick every 1 second is a pretty good interval for checking this, accurate but not an overkill.


Now let's write some code. Since we're using an unmanaged library, first comes the additional using statement:


using System.Runtime.InteropServices;

Next comes the signature function and the definition of the struct that is passed to it:


// Unmanaged function from user32.dll
[DllImport("user32.dll")]
static extern bool GetLastInputInfo(ref LASTINPUTINFO plii);

// Struct we'll need to pass to the function
internal struct LASTINPUTINFO
{
    public uint cbSize;
    public uint dwTime;
}

Now it's time to double-click the tmrIdle Timer object so that we get to its Tick event. Here comes the main code, which is self-explanatory thanks to the comments:


private void tmrIdle_Tick(object sender, EventArgs e)
{
    // Get the system uptime
    int systemUptime = Environment.TickCount;
    // The tick at which the last input was recorded
    int LastInputTicks = 0;
    // The number of ticks that passed since last input
    int IdleTicks = 0;

    // Set the struct
    LASTINPUTINFO LastInputInfo = new LASTINPUTINFO();
    LastInputInfo.cbSize = (uint)Marshal.SizeOf(LastInputInfo);
    LastInputInfo.dwTime = 0;

    // If we have a value from the function
    if (GetLastInputInfo(ref LastInputInfo))
    {
        // Get the number of ticks at the point when the last activity was seen
        LastInputTicks = (int)LastInputInfo.dwTime;
        // Number of idle ticks = system uptime ticks - number of ticks at last input
        IdleTicks = systemUptime - LastInputTicks;
    }

    // Set the labels; divide by 1000 to transform the milliseconds to seconds
    lblSystemUptime.Text = Convert.ToString(systemUptime / 1000) + " seconds";
    lblIdleTime.Text = Convert.ToString(IdleTicks / 1000) + " seconds";
    lblLastInput.Text = "At second " + Convert.ToString(LastInputTicks / 1000);
}

Retrieving the operating system uptime is done through managed code (Environment.TickCount), however the last activity time is retrieved through the unmanaged GetLastInputInfo() function that we prepared earlier. From then on, calculating the last input ticks is simple math: subtract the last activity milliseconds from the system uptime and there you have it.

Speech Recognition in .Net using C#

Speech recognition is a much more difficult task than simply making the computer speak. So you would think that it would mean that there would be a good 100 to 200 lines of code required to get the task done. But with .Net it's more like 8.

   1: SpeechRecognitionEngine RecognitionEngine = new SpeechRecognitionEngine();
   2: RecognitionEngine.LoadGrammar(new DictationGrammar());
   3: RecognitionResult Result = RecognitionEngine.Recognize();
   4: StringBuilder Output = new StringBuilder();
   5: foreach (RecognizedWordUnit Word in Result.Words)
   6: {
   7:     Output.Append(Word.Text);
   8: }

The code above should be pretty obvious as to what is going on, with one exception. The LoadGrammar line might give you some pause. The system basically needs to know what to be looking for and has two modes. The first mode is dictation. This is what you would use for something like Word (and is what I show above). The second mode is command mode. In that case you have to build your own grammar (passing in text words, etc. for it to look for). The main reason to use this if you wanted to control an application with specific phrases. Other things to note is that the code above is synchronous. If you wanted to, you can do this async and have it notify you when it's done. We have other options as well, such as the ability to tie it to a wave file, etc. just like the text to speech bit of code.

Anyway, the SpeechRecognitionEngine is apart of the System.Speech.Recognition namespace. It's basically our gateway to the built in speech recognition software that Microsoft uses. Well, sort of anyway... Normally when Microsoft puts something in .Net, it means that it will work.

Speech recognition doesn't seem to want to on Windows Server 2008... I spent the better part of a day trying to get it to work with nothing to show for it. Anyway, on Vista and Windows 7, this code will give you speech recognition. With XP, you have to download and install the Speech SDK from Microsoft. Windows Server 2003 seems to also work with that download, but Windows Server 2008 seems busted at this point (and I'm guessing there is no rush to fix that).

There are claims out there that you can get it to work but none of them have worked for me thus far. Anyway, I hope this helps someone. Give it a try, leave feedback, and happy coding.

Friday 14 October 2011

XNA Beginners Video Tutorial

CS & IT Symposium 2010: Computer Science, Game Development, and the XNA Game Studio Platform 

Computer Science Teachers Association
Computer Science & Information Technology Symposium 2010
July 13, 2010

Computer Science, Game Development and the XNA Game Studio Platform
Presented by Alfred Thompson & Steve Scanlan


This presentation talks about creating and implementing a high school game development curriculum using the (free) XNA Game Studio. We present the reasoning behind this type of course, show screenshots and a video introduction to student projects, as well as show examples of the sort of code students can create. We also talk about how freely available curriculum has been used and modified with real students. We present a collection of helpful resources including websites, tutorials and videos from Microsoft and independent web sites.

For more information, please see http://csta.acm.org/


XNA Beginners Video Tutorial1 Part1


XNA Beginners Video Tutorial2 Part1


XNA Beginners Video Tutorial2 Part2


Microsoft XNA Game Programming


Microsoft XNA is a set of tools with a managed runtime environment provided by Microsoft that facilitates video game development and management. XNA attempts to free game developers from writing "repetitive boilerplate code" and to bring different aspects of game production into a single system. The XNA toolset was announced March 24, 2004, at the Game Developers Conference in San Jose, California. A first Community Technology Preview of XNA Build was released on March 14, 2006. XNA Game Studio 2.0 was released in December 2007, followed by XNA Game Studio 3.0 on October 30, 2008. XNA Game Studio 4.0 was released on September 16, 2010 along with the Windows Phone 7 Development Tools.
XNA currently encompasses Microsoft's entire Game Development Sections, including the standard Xbox Development Kit and XNA Game Studio.

The name "XNA" originated out of the project's development name, Xbox New Architecture. Instead of being released under the Xbox name, the Xbox 360 was released (2005), and XNA came to stand for "XNA is Not an Acronym".

XNA Framework

The XNA Framework is based on the native implementation of .NET Compact Framework 2.0 for Xbox 360 development and .NET Framework 2.0 on Windows. It includes an extensive set of class libraries, specific to game development, to promote maximum code reuse across target platforms. The framework runs on a version of the Common Language Runtime that is optimized for gaming to provide a managed execution environment. The runtime is available for Windows XP, Windows Vista, Windows 7, Windows Phone 7 and Xbox 360. Since XNA games are written for the runtime, they can run on any platform that supports the XNA Framework with minimal or no modification. Games that run on the framework can technically be written in any .NET-compliant language, but only C# in XNA Game Studio Express IDE and all versions of Visual Studio 2008 and 2010 (as of XNA 4.0) are officially supported. Support for Visual Basic .NET was added in 2011.

The XNA Framework encapsulates low-level technological details involved in coding a game, making sure that the framework itself takes care of the difference between platforms when games are ported from one compatible platform to another, and thereby allowing game developers to focus more on the content and gaming experience. The XNA Framework integrates with a number of tools, such as the Cross-platform Audio Creation Tool (XACT), to aid in content creation. The XNA Framework provides support for both 2D and 3D game creation and allows use of the Xbox 360 controllers and vibrations. XNA framework games that target the Xbox platform can currently only be distributed by members of the Microsoft XNA Creator's Club which carries a $99/year subscription fee. Desktop applications can be distributed free of charge under Microsoft's current licensing.

XNA Build

XNA Build is a set of game asset pipeline management tools, which help by defining, maintaining, debugging, and optimizing the game asset pipeline of individual game development efforts. A game asset pipeline describes the process by which game content, such as textures and 3D models, are modified to a form suitable for use by the gaming engine. XNA Build helps identify the pipeline dependencies, and also provides API access to enable further processing of the dependency data. The dependency data can be analyzed to help reduce the size of a game by finding content that is not actually used. For example, XNA Build analysis revealed that 40% of the textures that shipped with MechCommander 2 were unused and could have been omitted.


XNA Game Studio

XNA Game Studio is an integrated development environment (IDE) for development of games. Five revisions have been released so far.

XNA Game Studio Express

XNA Game Studio Express, the first release of XNA Game Studio, was intended for students, hobbyist, and independent (and homebrew) game developers. It was available as a free download. Express provides basic "starter kits" for rapid development of specific genres of games, such as platform games, real-time strategy, and first-person shooters. Developers could create Windows games for free with the XNA Framework, but to run their games on the Xbox 360 they will have to pay an annual fee of US$99 (or a four-month fee of US$49) for admission to the Microsoft XNA Creator's Club. The initial release had no way of shipping precompiled binaries to other Xbox 360 players, but this was changed in "XNA Game Studio Express 1.0 Refresh" which made it possible to compile Xbox 360 binaries and share them with other Microsoft XNA Creator's Club members.

The first beta version of XNA Game Studio Express was released for download on August 30, 2006, followed by a second version on November 1, 2006. Microsoft released the final version on December 11, 2006.


On April 24, 2007, Microsoft released an update called XNA Game Studio Express 1.0 Refresh.

XNA Game Studio 2.0

XNA Game Studio 2.0 was released on December 13, 2007. XNA Game Studio 2.0 features the ability to be used with all versions of Visual Studio 2005 (including the free Visual C# 2005 Express Edition), a networking API using Xbox Live on both Windows and Xbox 360 and better device handling.

XNA Game Studio 3.0

XNA Game Studio 3.0 (for Visual Studio 2008 or the free Visual C# 2008 Express Edition) allows production of games targeting the Zune platform and adds Xbox Live community support. A beta of the toolset was released in September 2008. The final release was released on 30 October 2008. XNA Game Studio 3.0 now supports C# 3.0, LINQ and most versions of Visual Studio 2008. There are several more new features of XNA Game Studio 3.0 also, such as a trial Mode added to XNA Game Studio 3.0 that will enable creators to easily add the required trial feature to their games, Xbox LIVE multi-player features like in-game invites, create cross-platform games that work on Windows, Xbox 360 and Zune.

XNA Game Studio 3.1

XNA Game Studio 3.1 was released on June 11, 2009. The API includes support for video playback, a revised audio API, Xbox LIVE Party system and support for games to use the Xbox 360 Avatars.

XNA Game Studio 4

XNA Game Studio 4 was announced and initially released as a "Community Technical Preview" at Game Developers Conference (GDC) on March 9, 2010, and in its final form on September 16, 2010. It adds support for the Windows Phone 7 platform (including 3D hardware acceleration), framework hardware profiles, configurable effects, built-in state objects, graphics device scalars and orientation, cross-platform and multi-touch input, microphone input and buffered audio playback, and Visual Studio 2010 integration.

XNA Framework Content Pipeline

The XNA Framework Content Pipeline is a set of tools that allows Visual Studio and XNA Studio to act "as the key design point around organizing and consuming 3D content".

XDK Extensions

Formerly known as XNA Game Studio Professional, XDK Extensions is an add-on to XNA Game Studio and requires the Microsoft Xbox 360 Development Kit. Both are only available for licensed Xbox developers. The extensions include additional managed APIs for achievements, leaderboards, and other features reserved for licensed game titles. Titles developed using XDK Extensions include winners of Microsoft's Dream-Build-Play competition among others. The most heavily publicized of these was The Dishwasher: Dead Samurai.

License agreement

The Microsoft XNA Framework 2.0 EULA specifically prohibits the distribution of commercial networked games that connect to Xbox Live and/or Games for Windows Live in the absence of a specific agreement signed by both the developer and Microsoft. This means that XNA Game Studio can still be used to develop commercial games and other programs for the Windows platform, although Microsoft's networking support code for Xbox/Windows Live cannot be used. Self-developed network code can still be used inside the developer's XNA project.

Games created using XNA Game Studio may be distributed via Xbox Live Indie Games and Windows Phone 7 marketplace. The software may also be used to create commercial games which target Windows.

XNA Indie Games

Xbox 360 games written in XNA Game Studio can be submitted to the App Hub, for which premium membership is required, this costs US$99/year. All games submitted to the App Hub are subjected to peer review by other creators. If the game passes review then it is listed on Xbox Live Marketplace. Creators can set a price of 80, 240 or 400 points for their game. The creator is paid 70% of the total revenue from their game sales as a baseline. Microsoft originally planned to take an additional percentage of revenue if they provided additional marketing for a game, but this policy was rescinded in March 2009, leaving the flat rate intact regardless of promotion.


Microsoft also distributes a free year premium App Hub subscription for educational establishments through their DreamSpark program and MSDNAA. These accounts allow students to develop games for the Xbox 360, but developers still need a premium Xbox Live account to submit their game to the marketplace.

Alternative implementations

A project called Mono.XNA was formed to port XNA to the open source and cross-platform Mono framework.


From the codebase of Mono.XNA and SilverSprite a new project called MonoGame was formed to port XNA to several mobile devices. As of 2011, support is stable for iOS (using MonoTouch) and limited for Google Android and Mac App Store.

An open source project called Grommet contains a limited port for embedded devices using the .NET Micro Framework

Monday 3 October 2011

Introduction to TCP client server in C#


Introduction

This is a simple implementation of a TCP client server relationship.

To use

Compile the server and client programs separately. Before compiling change the IP address in both programs to match that of your machine (NOTE : to get your IP address run 'ipconfig' from the command prompt in Windows NT/2000 m/c's)
When the server program is run, it will indicate at which IP it is running and the port it is listening to. Now run the client program is run , so as to establish a connection with the server.
When a connection is established the server will display the IP address and Port from where it has accepted the connection and client will ask for the string which is to be transmitted to the server.
The server on reciept of the string will display it, send an acknowledgement which will be recieved by the client.
The client can be either run from the same machine as the server or from a different machine. If run from a different machine then a network connection should exist between the machines running the server and client programs
//

/*   Server Program    */
                 
using System;
using System.Text;
using System.Net;
using System.Net.Sockets;

public class serv {
    public static void Main() {
    try {
        IPAddress ipAd = IPAddress.Parse("172.21.5.99");
         // use local m/c IP address, and 

         // use the same in the client


/* Initializes the Listener */
        TcpListener myList=new TcpListener(ipAd,8001);

/* Start Listeneting at the specified port */        
        myList.Start();
        
        Console.WriteLine("The server is running at port 8001...");    
        Console.WriteLine("The local End point is  :" + 
                          myList.LocalEndpoint );
        Console.WriteLine("Waiting for a connection.....");
        
        Socket s=myList.AcceptSocket();
        Console.WriteLine("Connection accepted from " + s.RemoteEndPoint);
        
        byte[] b=new byte[100];
        int k=s.Receive(b);
        Console.WriteLine("Recieved...");
        for (int i=0;i<k;i++)
            Console.Write(Convert.ToChar(b[i]));

        ASCIIEncoding asen=new ASCIIEncoding();
        s.Send(asen.GetBytes("The string was recieved by the server."));
        Console.WriteLine("\nSent Acknowledgement");
/* clean up */            
        s.Close();
        myList.Stop();
            
    }
    catch (Exception e) {
        Console.WriteLine("Error..... " + e.StackTrace);
    }    
    }
    
}

--------------------------------------------------------------------

/*       Client Program      */

using System;
using System.IO;
using System.Net;
using System.Text;
using System.Net.Sockets;


public class clnt {

    public static void Main() {
        
        try {
            TcpClient tcpclnt = new TcpClient();
            Console.WriteLine("Connecting.....");
            
            tcpclnt.Connect("172.21.5.99",8001);
            // use the ipaddress as in the server program

            
            Console.WriteLine("Connected");
            Console.Write("Enter the string to be transmitted : ");
            
            String str=Console.ReadLine();
            Stream stm = tcpclnt.GetStream();
                        
            ASCIIEncoding asen= new ASCIIEncoding();
            byte[] ba=asen.GetBytes(str);
            Console.WriteLine("Transmitting.....");
            
            stm.Write(ba,0,ba.Length);
            
            byte[] bb=new byte[100];
            int k=stm.Read(bb,0,100);
            
            for (int i=0;i<k;i++)
                Console.Write(Convert.ToChar(bb[i]));
            
            tcpclnt.Close();
        }
        
        catch (Exception e) {
            Console.WriteLine("Error..... " + e.StackTrace);
        }
    }

}

Network Programming in C#


The .NET framework provides two namespaces, System.Net and System.Net.Sockets for network programming. The classes and methods of these namespaces help us to write programs, which can communicate across the network. The communication can be either connection oriented or connectionless. They can also be either stream oriented or data-gram based. The most widely used protocol TCP is used for stream-based communication and UDP is used for data-grams based applications.
The System.Net.Sockets.Socket is an important class from the System.Net.Sockets namespace. A Socket instance has a local and a remote end-point associated with it. The local end-point contains the connection information for the current socket instance.
There are some other helper classes like IPEndPoint, IPADdress, SocketException etc, which we can use for Network programming. The .NET framework supports both synchronous and asynchronous communication between the client and server. There are different methods supporting for these two types of communication.

A synchronous method is operating in blocking mode, in which the method waits until the operation is complete before it returns. But an asynchronous method is operating in non-blocking mode, where it returns immediately, possibly before the operation has completed.


Dns Class
The System.net namespace provides this class, which can be used to creates and send queries to obtain information about the host server from the Internet Domain Name Service (DNS). Remember that in order to access DNS, the machine executing the query must be connected to a network. If the query is executed on a machine, that does not have access to a domain name server, a System.Net.SocketException is thrown. All the members of this class are static in nature. The important methods of this class are given below.
public static IPHostEntry GetHostByAddress(string address)
Where address should be in a dotted-quad format like "202.87.40.193". This method returns an IPHostEntry instance containing the host information. If DNS server is not available, the method returns a SocketException.
public static string GetHostName()
This method returns the DNS host name of the local machine.
In my machine Dns.GetHostName() returns vrajesh which is the DNS name of my machine.
public static IPHostEntry Resolve(string hostname)
This method resolves a DNS host name or IP address to a IPHostEntry instance. The host name should be in a dotted-quad format like 127.0.01 or www.microsoft.com.
IPHostEntry Class
This is a container class for Internet host address information. This class makes no thread safety guarantees. The following are the important members of this class.
AddressList Property
Gives an IPAddress array containing IP addresses that resolve to the host name.
Aliases Property
Gives a string array containing DNS name that resolves to the IP addresses in AddressList property.
The following program shows the application of the above two classes.
using System;
using System.Net;
using System.Net.Sockets;
class MyClient
{
public static void Main()
{
IPHostEntry IPHost = Dns.Resolve("www.hotmail.com");
Console.WriteLine(IPHost.HostName);
string []aliases = IPHost.Aliases;
Console.WriteLine(aliases.Length);
IPAddress[] addr = IPHost.AddressList;
Console.WriteLine(addr.Length);
for(int i= 0; i < addr.Length ; i++)
{
Console.WriteLine(addr[i]);
}
}
}

IPEndPoint Class
This class is a concrete derived class of the abstract class EndPoint. The IPEndPoint class represents a network end point as an IP address and a port number. There is couple of useful constructors in this class:
IPEndPoint(long addresses, int port)
IPEndPoint (IPAddress addr, int port)
IPHostEntry IPHost = Dns.Resolve("www.c-sharpcorner.com");
Console.WriteLine(IPHost.HostName);
string []aliases = IPHost.Aliases;
IPAddress[] addr = IPHost.AddressList;
Console.WriteLine(addr[0]);
EndPoint ep = new IPEndPoint(addr[0],80);


Socket Programming: Synchronous Clients
The steps for creating a simple synchronous client are as follows.
  1. Create a Socket instance.
  2. Connect the above socket instance to an end-point.
  3. Send or Receive information.
  4. Shutdown the socket
  5. Close the socket
The Socket class provides a constructor for creating a Socket instance.
public Socket (AddressFamily af, ProtocolType pt, SocketType st)
Where AddressFamily, ProtocolType and SocketTYpe are the enumeration types declared inside the Socket class.
The AddressFamily member specifies the addressing scheme that a socket instance must use to resolve an address. For example AddressFamily.InterNetwork indicates that an IP version 4 addresses is expected when a socket connects to an end point.
The SocketType parameter specifies the socket type of the current instance. For example SocketType.Stream indicates a connection-oriented stream and SocketType.Dgram indicates a connectionless stream.
The ProtocolType parameter specifies the ptotocol to be used for the communication. For example ProtocolType.Tcp indicates that the protocol used is TCP and ProtocolType.Udp indicates that the protocol using is UDP.
public Connect (EndPoint ep)
The Connect() method is used by the local end-point to connect to the remote end-point. This method is used only in the client side. Once the connection has been established the Send() and Receive() methods can be used for sending and receiving the data across the network.
The Connected property defined inside the class Socket can be used for checking the connection. We can use the Connected property of the Socket class to know whether the current Socket instance is connected or not. A property value of true indicates that the current Socket instance is connected.
IPHostEntry IPHost = Dns.Resolve("www.c-sharpcorner.com");
Console.WriteLine(IPHost.HostName);
string []aliases = IPHost.Aliases;
IPAddress[] addr = IPHost.AddressList;
Console.WriteLine(addr[0]);
EndPoint ep = new IPEndPoint(addr[0],80);
Socket sock = new
Socket(AddressFamily.InterNetwork,SocketType.Stream,ProtocolType.Tcp);
sock.Connect(ep);
if(sock.Connected)
Console.WriteLine("OK");

The Send() method of the socket class can be used to send data to a connected remote socket.
public int Send (byte[] buffer, int size, SocketFlags flags)
Where byte[] parameter storing the data to send to the socket, size parameter containing the number of bytes to send across the network. The SocketFlags parameter can be a bitwise combination of any one of the following values defined in the System.Net.Sockets.SocketFlags enumerator.

SocketFlags.None
SocketFlags.DontRoute
SocketFlags.OutOfBnd

The method Send() returns a System.Int32 containing the number of bytes send.Remember that there are other overloaded versions of Send() method as follows.
public int Send (byte[] buffer, SocketFlags flags)
public int Send (byte[] buffer)
public int Send (byte[] buffer,int offset, int size, SocketFlags flags)

The Receive() method can be used to receive data from a socket.
public int Receive(byte[] buffer, int size, SocketFlags flags)
Where byte[] parameter storing the data to send to the socket, size parameter containing the number of bytes to send across the network. The SocketFlags parameter can be a bitwise combination of any one of the following values defined in the System.Net.Sockets.SocketFlags enumerator explained above.
The overloaded versions of Receive() methods are shown below.
public int Receive (byte[] buffer, SocketFlags flags)
public int Receive (byte[] buffer)
public int Receive (byte[] buffer,int offset, int size, SocketFlags flags)

When the communication across the sockets is over, the connection between the sockets can be terminated by invoking the method ShutDown()
public void ShutDown(SocketShutdown how)
Where ‘how’ is one of the values defined in the SocketSHutdown enumeration. The value SoketShutdown.Send means that the socket on the other end of the connection is notified that the current instance would not send any more data.
The value SoketShutdown.Receive means that the socket on the other end of the connection is notified that the current instance will not receive any more data and the value SoketShutdown.Both means that both the action are not possible.
Remember that the ShutDown() method must be called before the Close(0 method to ensure that all pending data is sent or received.
A socket can be closed by invoking the method Close().
public void Close()
This method closes the current instance and releases all managed and un-managed resources allocated by the current instance. This method internally calls the Dispose() method with an argument of ‘true’ value, which frees both managed and un-managed resources used by the current instance.
protected virtual void Dispose(bool)
The above method closes the current instance and releases the un-managed resources allocated by the current instance and exceptionally release the managed resources also. An argument value of ‘true’ releases both managed and un-managed resources and a value of ‘false’ releases only un-managed resources.
The source code for a simple synchronous client by using the sockets is show below. The following program can send an HTTP request to a web server and can read the response from the web server.
using System;
using System.Net;
using System.Net.Sockets;
using System.Text;
class MyClient
{
public static void Main()
{
IPHostEntry IPHost = Dns.Resolve("
www.google.com
");
Console.WriteLine(IPHost.HostName);
string []aliases = IPHost.Aliases;
IPAddress[] addr = IPHost.AddressList;
Console.WriteLine(addr[0]);
EndPoint ep = new IPEndPoint(addr[0],80);
Socket sock = new Socket(AddressFamily.InterNetwork,SocketType.Stream,ProtocolType.Tcp);
sock.Connect(ep);
if(sock.Connected)
Console.WriteLine("OK");
Encoding ASCII = Encoding.ASCII;
string Get = "GET / HTTP/1.1\r\nHost: " + "www. google.com" +
"\r\nConnection: Close\r\n\r\n";
Byte[] ByteGet = ASCII.GetBytes(Get);
Byte[] RecvBytes = new Byte[256];
sock.Send(ByteGet, ByteGet.Length, 0);
Int32 bytes = sock.Receive(RecvBytes, RecvBytes.Length, 0);
Console.WriteLine(bytes);
String strRetPage = null;
strRetPage = strRetPage + ASCII.GetString(RecvBytes, 0, bytes);
while (bytes > 0)
{
bytes = sock.Receive(RecvBytes, RecvBytes.Length, 0);
strRetPage = strRetPage + ASCII.GetString(RecvBytes, 0, bytes);
Console.WriteLine(strRetPage );
}
sock.ShutDown(SocketShutdown.Both);
sock.Close();
}
}

A Chat Client/Server Program for C#

Here's some code for a chat server, and an accompanying client program.
The client:

using System.IO;
using System.Net;
using System;
using System.Threading;
using N = System.Net;
using System.Collections;
using System.Windows.Forms;
using System.ComponentModel;
using System.Runtime.InteropServices;

class TalkUser {

static Form talk;
static N.Sockets.TcpClient TC;

[DllImport("kernel32.dll")]
private static extern void ExitProcess(int a);

public static void Main() {
talk = new Form();
talk.Text = "TalkUser - The OFFICIAL TalkServ Client";
talk.Closing += new CancelEventHandler(talk_Closing);
talk.Controls.Add(new TextBox());
talk.Controls[0].Dock = DockStyle.Fill;
talk.Controls.Add(new TextBox());
talk.Controls[1].Dock = DockStyle.Bottom;
((TextBox)talk.Controls[0]).Multiline = true;
((TextBox)talk.Controls[1]).Multiline = true;
talk.WindowState = FormWindowState.Maximized;
talk.Show();
((TextBox)talk.Controls[1]).KeyUp += new KeyEventHandler(key_up);
TC = new N.Sockets.TcpClient();
TC.Connect("IP OF A SERVER HERE",4296);
Thread t = new Thread(new ThreadStart(run));
t.Start();
while(true) {
Application.DoEvents();
}
}

private static void talk_Closing(object s, CancelEventArgs e) {
e.Cancel = false;
Application.Exit();
ExitProcess(0);
}

private static void key_up(object s,KeyEventArgs e) {
TextBox TB = (TextBox)s;
if(TB.Lines.Length>1) {
StreamWriter SW = new StreamWriter(TC.GetStream());
SW.WriteLine(TB.Text);
SW.Flush();
TB.Text = "";
TB.Lines = null;
}
}

private static void run() {
StreamReader SR = new StreamReader(TC.GetStream());
while(true) {
Application.DoEvents();
TextBox TB = (TextBox)talk.Controls[0];
TB.AppendText(SR.ReadLine()+"\r\n");
TB.SelectionStart = TB.Text.Length;
}
}
}
And the server:
using System.IO;
using System.Net;
using System;
using System.Threading;
using N = System.Net;
using System.Collections;

class TalkServ {

System.Net.Sockets.TcpListener server;
public static Hashtable handles;
public static Hashtable handleByConnect;

public static void Main() {
TalkServ TS = new TalkServ();
}

public TalkServ() {
handles = new Hashtable(100);
handleByConnect = new Hashtable(100);
server = new System.Net.Sockets.TcpListener(4296);
while(true) {
server.Start();
if(server.Pending()) {
N.Sockets.TcpClient connection = server.AcceptTcpClient();
Console.WriteLine("Connection made");
BackForth BF = new BackForth(connection);
}
}
}

public static void SendToAll(string name,string msg) {
StreamWriter SW;
ArrayList ToRemove = new ArrayList(0);
N.Sockets.TcpClient[] tc = new N.Sockets.TcpClient[TalkServ.handles.Count];
TalkServ.handles.Values.CopyTo(tc,0);
for(int i=0;i<tc.Length;i++) {
try {
if(msg.Trim()==""||tc[i]==null)
continue;
SW = new StreamWriter(tc[i].GetStream());
SW.WriteLine(name + ": " + msg);
SW.Flush();
SW = null;
} catch(Exception e44) { e44 = e44;
string g = (string) TalkServ.handleByConnect[tc[i]];
TalkServ.SendSysMsg("** " + g + " ** HAS LEFT US.");
TalkServ.handles.Remove(g);
TalkServ.handleByConnect.Remove(tc[i]);
}
}
}

public static void SendSysMsg(string msg) {
StreamWriter SW;
ArrayList ToRemove = new ArrayList(0);
N.Sockets.TcpClient[] tc = new N.Sockets.TcpClient[TalkServ.handles.Count];
TalkServ.handles.Values.CopyTo(tc,0);
for(int i=0;i<tc.Length;i++) {
try {
if(msg.Trim()==""||tc[i]==null)
continue;
SW = new StreamWriter(tc[i].GetStream());
SW.WriteLine(msg);
SW.Flush();
SW = null;
} catch(Exception e44) { e44 = e44;
TalkServ.handles.Remove(TalkServ.handleByConnect[tc[i]]);
TalkServ.handleByConnect.Remove(tc[i]);
}
}
}
}//end of class TalkServ

class BackForth {
N.Sockets.TcpClient client;
System.IO.StreamReader SR;
System.IO.StreamWriter SW;
string handle;

public BackForth(System.Net.Sockets.TcpClient c) {
client = c;
Thread t = new Thread(new ThreadStart(init));
t.Start();
}

private string GetHandle() {
SW.WriteLine("What is your handle? ");
SW.Flush();
return SR.ReadLine();
}

private void run() {
try {
string l = "";
while(true) {
l = SR.ReadLine();
TalkServ.SendToAll(handle,l);
}
} catch(Exception e44) { Console.WriteLine(e44); }
}

private void init() {
SR = new System.IO.StreamReader(client.GetStream());
SW = new System.IO.StreamWriter(client.GetStream());
SW.WriteLine("WELCOME TO TalkServ! Be Nice!");
//SW.WriteLine("What is your handle? ");
//SW.Flush();
handle = GetHandle();
while(TalkServ.handles.Contains(handle)) {
SW.WriteLine("ERR - Handle already exists!");
handle = GetHandle();
}
TalkServ.handles.Add(handle,client);
TalkServ.handleByConnect.Add(client,handle);
TalkServ.SendSysMsg("** " + handle + " ** HAS JOINED US.");
SW.WriteLine("Now Talking.....\r\n-------------------------------");
SW.Flush();
Thread t = new Thread(new ThreadStart(run));
t.Start();
}
}

C# code for opening and closing CD,DVD ROM

using System;
using System.IO;
using System.Runtime.InteropServices;

class Test
{
    const int OPEN_EXISTING = 3;
    const uint GENERIC_READ = 0x80000000;
    const uint GENERIC_WRITE = 0x40000000;
    const uint IOCTL_STORAGE_EJECT_MEDIA = 2967560;

    [DllImport("kernel32")]
    private static extern IntPtr CreateFile
        (string filename, uint desiredAccess,
         uint shareMode, IntPtr securityAttributes,
         int creationDisposition, int flagsAndAttributes,
         IntPtr templateFile);

    [DllImport("kernel32")]
    private static extern int DeviceIoControl
        (IntPtr deviceHandle, uint ioControlCode,
         IntPtr inBuffer, int inBufferSize,
         IntPtr outBuffer, int outBufferSize,
         ref int bytesReturned, IntPtr overlapped);

    [DllImport("kernel32")]
    private static extern int CloseHandle(IntPtr handle);

    static void EjectMedia(char driveLetter)
    {
        string path = "\\\\.\\" + driveLetter + ":";
        IntPtr handle = CreateFile(path, GENERIC_READ | GENERIC_WRITE, 0,
                                   IntPtr.Zero, OPEN_EXISTING, 0,
                                   IntPtr.Zero);
        if ((long)handle == -1)
        {
            throw new IOException("Unable to open drive " + driveLetter);
        }
        int dummy = 0;
        DeviceIoControl(handle, IOCTL_STORAGE_EJECT_MEDIA, IntPtr.Zero, 0,
                        IntPtr.Zero, 0, ref dummy, IntPtr.Zero);
        CloseHandle(handle);
    }

    static void Main()
    {
        EjectMedia('g');
    }
}

Friday 30 September 2011

Getting Started with the Facebook C# SDK

Facebook recently announced the release of the Facebook C# SDK. The SDK allows .NET developers to create Facebook applications by directly calling their API. To get started with the SDK, follow these steps:
  1. Download the source and build the FacebookAPI project.
  2. Create your Facebook application from the Developer Section of your Facebook profile’s Application Settings.
  3. Coding your application to use the FacebookAPI.
In this example, I’ll demonstrate the creation of a simple .NET application that communicates with Facebook to pull my profile and friends list.

Building the FacebookAPI Project

First, download the source of the Facebook API project. Open the solution FacebookAPI.sln in Visual Studio and build the project. You will later use Facebook API assembly to interact with Facebook via .NET.

Creating the Application on Facebook

In order to successfully make calls to Facebook, you have to first register your application with Facebook and obtain authentication keys to be used with OAuth 2.0.
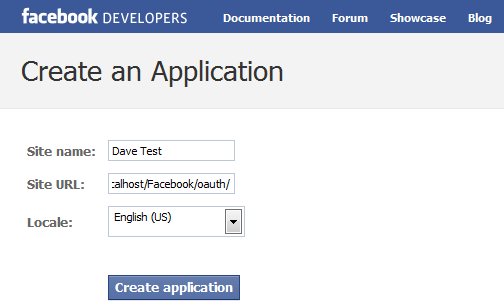
1. Go to http://developers.facebook.com/setup/ to begin registering your application. Make sure you use Internet Explorer. I ran into problems when attempting to register using Firefox (application would register, but a blank page was displayed).
2. Register the application using a site name and URL of the path relative to your authenticating logic. The redirect_url parameter you provide to the Facebook Graph API needs to match the path used to register the application.
create facebook application
In this example, I’ve registered the application as:
    Site Name: Dave Test
    Site URL: http://localhost/Facebook/oauth/
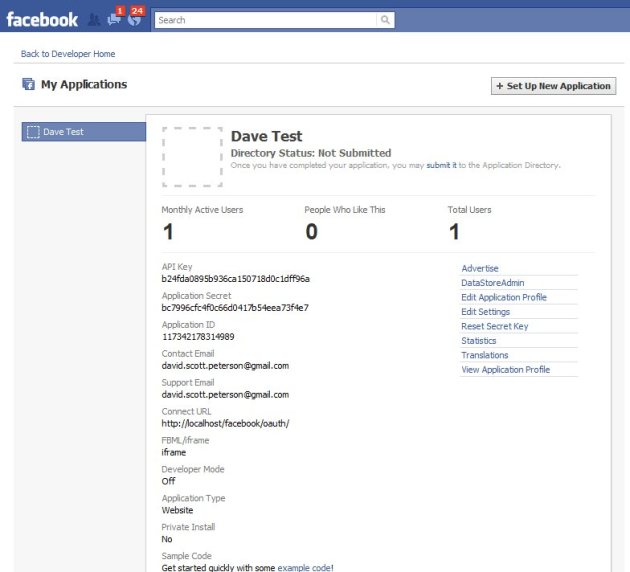
3. Once registered, you can view your application’s configuration settings and authentication keys. These details will be referenced in the example code to make requests to Facebook.
my application overview

Coding the Application

To accomplish the task of pulling my Facebook profile and friends list, I need to do the following:
  • Redirect from my local web application to Facebook with my application id and URL of my redirect handler
  • Construct the redirect URL handler to accept the access token provided by Facebook
  • Instantiate the FacebookAPI object with the access token above
  • Access my Profile via the FacebookAPI
1. Redirecting to Facebook
We need to send Facebook our application id and URL of the handler for Facebook’s redirect, containing our access token.
protected void btnAuthenticate_Click(object sender, EventArgs e)
{
    string clientId = "117342178314989";
    string redirectUrl = "http://localhost/Facebook/oauth/oauth-redirect.aspx";
 
    Response.Redirect(string.Format("https://graph.facebook.com/oauth/authorize?client_id={0}&redirect_uri={1}", clientId, redirectUrl));
}
Notice that the variable clientId matches the field Application Id in my Facebook Application configuration settings and the relative path in the variable redirectUrl matches the path defined in the field Connect URL.
After redirecting, a response is sent back to http://localhost/Facebook/oauth/oauth-redirect.aspx containing a code in the query string parameters of the URL. Successfully making a call, results in the following URL:
http://localhost/Facebook/oauth/oauth-redirect.aspx?code=2.UwNcNB5FfO69d_l5S1j76Q__.3600.1280984400-1427490881%7CGE2JRQaeMDwAZHwZMkk0NUiMQD4.

Notice the parameter code. This value will be used to request an access token from Facebook’s Graph API.
2. Building the Handler for Facebook’s Redirect
In step 1, we’ve created the request to Facebook. In step 2, we need to build the handler to accept the access token provided by Facebook to successfully make API calls.
Currently, there’s nothing built into the API that requests the access token, so I had to build one. The code below calls the Facebook Graph API, requesting an access token.
private Dictionary<string, string> GetOauthTokens(string code)
{
    Dictionary<string, string> tokens = new Dictionary<string, string>();
 
    string clientId = "117342178314989";
    string redirectUrl = "http://localhost/Facebook/oauth/oauth-redirect.aspx";
    string clientSecret = "bc7996cfc4f0c66d0417b54eea73f4e7";
    string scope = "read_friendlists,user_status";
 
    string url = string.Format("https://graph.facebook.com/oauth/access_token?client_id={0}&redirect_uri={1}&client_secret={2}&code={3}&scope={4}",
                    clientId, redirectUrl, clientSecret, code, scope);
 
    HttpWebRequest request = WebRequest.Create(url) as HttpWebRequest;
    using (HttpWebResponse response = request.GetResponse() as HttpWebResponse)
    {
        StreamReader reader = new StreamReader(response.GetResponseStream());
        string retVal = reader.ReadToEnd();
 
        foreach (string token in retVal.Split('&'))
        {
            tokens.Add(token.Substring(0, token.IndexOf("=")),
                token.Substring(token.IndexOf("=") + 1, token.Length - token.IndexOf("=") - 1));
        }
    }
 
    return tokens;
}
Variables clientId and clientSecret should match fields Application Id and Application Secret, respectively, in the Facebook Application Settings page.
Scope defines the scope of the request. These values are considered Extended Permissions which means requesting access to data not marked as public to everyone in a user’s Facebook profile.
3. Instantiate FacebookAPI with an Access Token
The method GetOauthTokens accepts a parameter code. We’ll pass in the code value obtained in the query string param of the response in step 1 and cache the response for the time defined by the expiration value in Facebook’s Graph API response.
protected void Page_Load(object sender, EventArgs e)
{
    if (Request.Params["code"] != null)
    {
        Facebook.FacebookAPI api = new Facebook.FacebookAPI(GetAccessToken());
        ...
    }
}
 
private string GetAccessToken()
{
    if (HttpRuntime.Cache["access_token"] == null)
    {
        Dictionary<string, string> args = GetOauthTokens(Request.Params["code"]);
        HttpRuntime.Cache.Insert("access_token", args["access_token"], null, DateTime.Now.AddMinutes(Convert.ToDouble(args["expires"])), TimeSpan.Zero);
    }
 
    return HttpRuntime.Cache["access_token"].ToString();
}
4. Access My Facebook Profile
Now that we have an active connection with Facebook, we can use the API in step 3 to request my profile information. Doing so is as easy as a few lines of code:
JSONObject me = api.Get("/me");
JSONObject meFriends = api.Get("/me/friends");
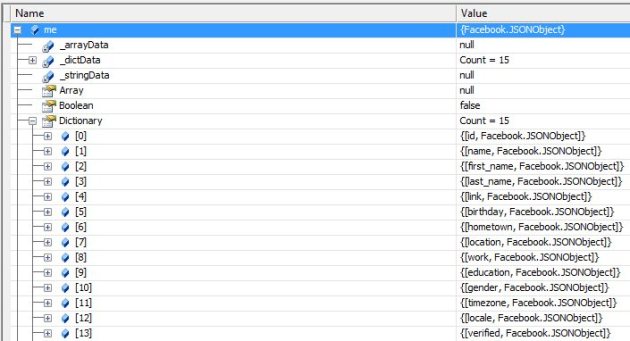
making Get requests to Facebook via the API returns JSON containing profile information. The first requests my profile while the second obtains my friends list.
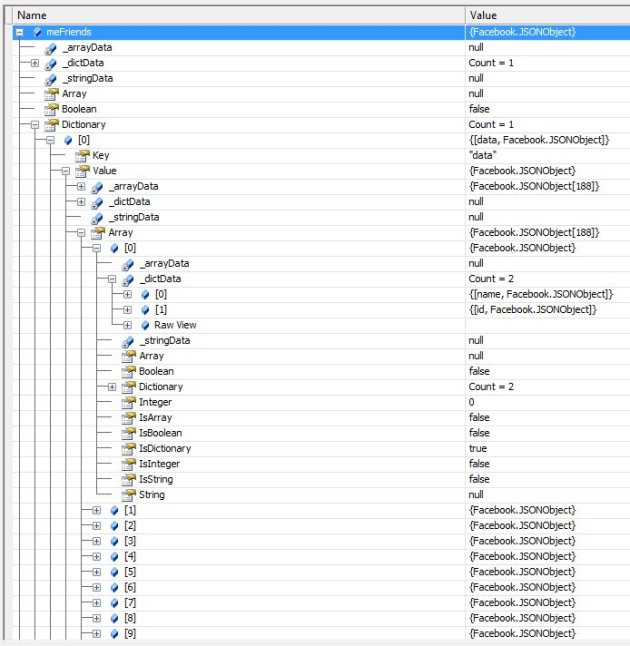
Placing a watch on these objects gives us
a watch on me
a watch of variable meFriends As you can see, the variable me contains all of my public profile attributes. The variable meFriends has all 188 of my friends in an array of dictionary items. Each friend is stored in an id/name combo. If we wanted, we could take this another level deeper and get all friends profiles by requesting the id via the Graph API like so (1427490881 is my Facebook id):
JSONObject me = api.Get("/1427490881");

Full Source

/Default.aspx.cs

using System;
using System.Collections;
using System.Configuration;
using System.Data;
using System.Linq;
using System.Web;
using System.Web.Security;
using System.Web.UI;
using System.Web.UI.HtmlControls;
using System.Web.UI.WebControls;
using System.Web.UI.WebControls.WebParts;
using System.Xml.Linq;
 
namespace Facebook
{
    public partial class _Default : System.Web.UI.Page
    {
        protected void btnAuthenticate_Click(object sender, EventArgs e)
        {
            string clientId = "117342178314989";
            string redirectUrl = "http://localhost/Facebook/oauth/oauth-redirect.aspx";
 
            Response.Redirect(string.Format("https://graph.facebook.com/oauth/authorize?client_id={0}&redirect_uri={1}", clientId, redirectUrl));
        }
    }
}

/oauth/oauth-redirect.aspx.cs

using System;
using System.Collections;
using System.Configuration;
using System.Data;
using System.Linq;
using System.Web;
using System.Web.Security;
using System.Web.UI;
using System.Web.UI.HtmlControls;
using System.Web.UI.WebControls;
using System.Web.UI.WebControls.WebParts;
using System.Xml.Linq;
using Facebook;
using System.IO;
using System.Net;
using System.Collections.Generic;
 
namespace Facebook
{
    public partial class oauth_redirect : System.Web.UI.Page
    {
        protected void Page_Load(object sender, EventArgs e)
        {
            if (Request.Params["code"] != null)
            {
                Facebook.FacebookAPI api = new Facebook.FacebookAPI(GetAccessToken());
 
                JSONObject me = api.Get("/me");
                JSONObject meFriends = api.Get("/me/friends");
            }
        }
 
        private string GetAccessToken()
        {
            if (HttpRuntime.Cache["access_token"] == null)
            {
                Dictionary<string, string> args = GetOauthTokens(Request.Params["code"]);
                HttpRuntime.Cache.Insert("access_token", args["access_token"], null, DateTime.Now.AddMinutes(Convert.ToDouble(args["expires"])), TimeSpan.Zero);
            }
 
            return HttpRuntime.Cache["access_token"].ToString();
        }
 
        private Dictionary<string, string> GetOauthTokens(string code)
        {
            Dictionary<string, string> tokens = new Dictionary<string, string>();
 
            string clientId = "117342178314989";
            string redirectUrl = "http://localhost/Facebook/oauth/oauth-redirect.aspx";
            string clientSecret = "bc7996cfc4f0c66d0417b54eea73f4e7";
            string scope = "read_friendlists,user_status";
 
            string url = string.Format("https://graph.facebook.com/oauth/access_token?client_id={0}&redirect_uri={1}&client_secret={2}&code={3}&scope={4}",
                            clientId, redirectUrl, clientSecret, code, scope);
 
            HttpWebRequest request = WebRequest.Create(url) as HttpWebRequest;
            using (HttpWebResponse response = request.GetResponse() as HttpWebResponse)
            {
                StreamReader reader = new StreamReader(response.GetResponseStream());
                string retVal = reader.ReadToEnd();
 
                foreach (string token in retVal.Split('&'))
                {
                    tokens.Add(token.Substring(0, token.IndexOf("=")),
                        token.Substring(token.IndexOf("=") + 1, token.Length - token.IndexOf("=") - 1));
                }
            }
 
            return tokens;
        }
    }
}