Facebook recently announced the release of the Facebook C# SDK. The SDK allows .NET developers to create Facebook applications by directly calling their API. To get started with the SDK, follow these steps:
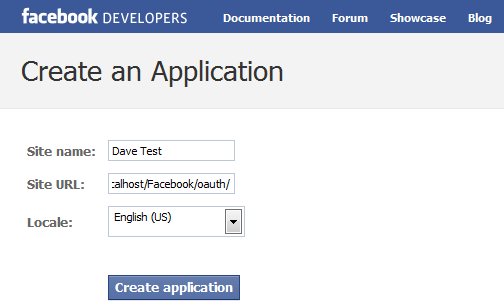
1. Go to http://developers.facebook.com/setup/ to begin registering your application. Make sure you use Internet Explorer. I ran into problems when attempting to register using Firefox (application would register, but a blank page was displayed).
2. Register the application using a site name and URL of the path relative to your authenticating logic. The redirect_url parameter you provide to the Facebook Graph API needs to match the path used to register the application.

In this example, I’ve registered the application as:
Site Name: Dave Test
Site URL: http://localhost/Facebook/oauth/
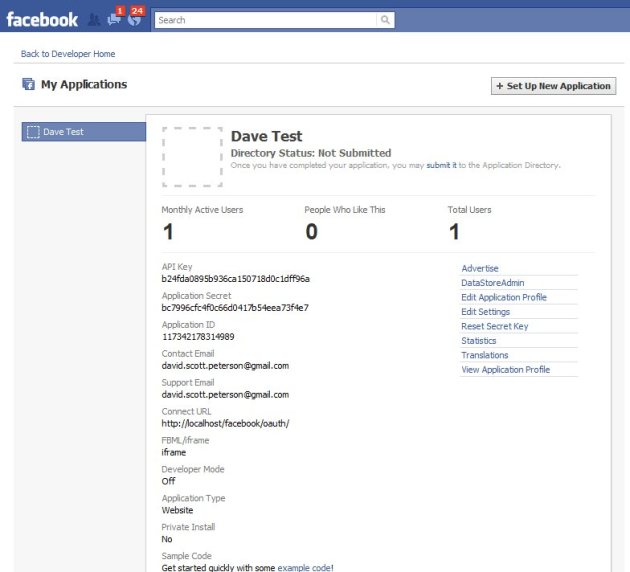
3. Once registered, you can view your application’s configuration settings and authentication keys. These details will be referenced in the example code to make requests to Facebook.

We need to send Facebook our application id and URL of the handler for Facebook’s redirect, containing our access token.
After redirecting, a response is sent back to http://localhost/Facebook/oauth/oauth-redirect.aspx containing a code in the query string parameters of the URL. Successfully making a call, results in the following URL:
2. Building the Handler for Facebook’s Redirect
In step 1, we’ve created the request to Facebook. In step 2, we need to build the handler to accept the access token provided by Facebook to successfully make API calls.
Currently, there’s nothing built into the API that requests the access token, so I had to build one. The code below calls the Facebook Graph API, requesting an access token.
Scope defines the scope of the request. These values are considered Extended Permissions which means requesting access to data not marked as public to everyone in a user’s Facebook profile.
3. Instantiate FacebookAPI with an Access Token
The method GetOauthTokens accepts a parameter code. We’ll pass in the code value obtained in the query string param of the response in step 1 and cache the response for the time defined by the expiration value in Facebook’s Graph API response.
Now that we have an active connection with Facebook, we can use the API in step 3 to request my profile information. Doing so is as easy as a few lines of code:
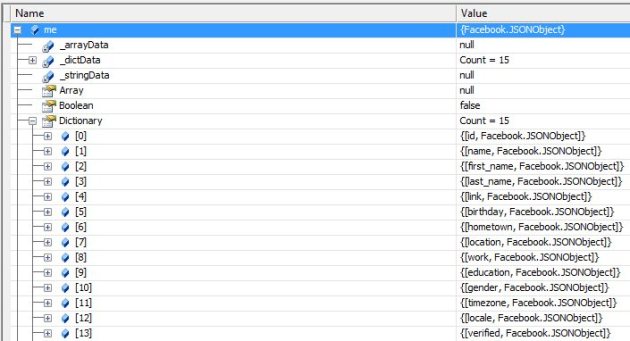
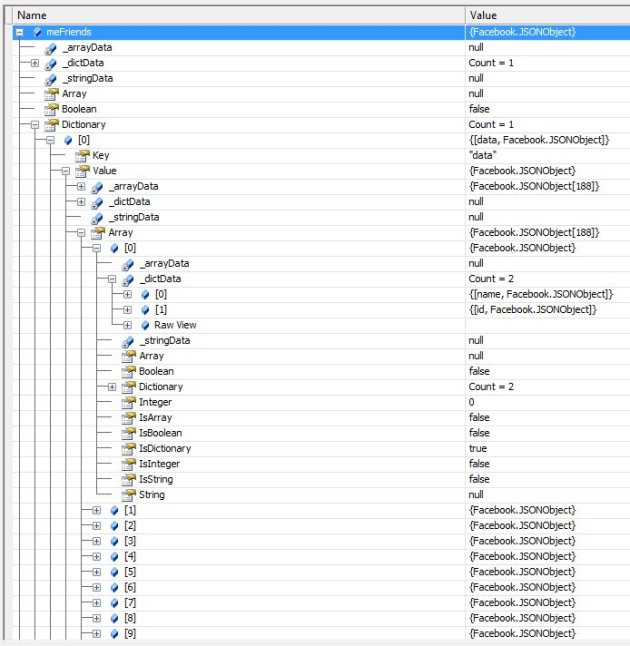
Placing a watch on these objects gives us

 As you can see, the variable me contains all of my public profile attributes. The variable meFriends has all 188 of my friends in an array of dictionary items. Each friend is stored in an id/name combo. If we wanted, we could take this another level deeper and get all friends profiles by requesting the id via the Graph API like so (1427490881 is my Facebook id):
- Download the source and build the FacebookAPI project.
- Create your Facebook application from the Developer Section of your Facebook profile’s Application Settings.
- Coding your application to use the FacebookAPI.
Building the FacebookAPI Project
First, download the source of the Facebook API project. Open the solution FacebookAPI.sln in Visual Studio and build the project. You will later use Facebook API assembly to interact with Facebook via .NET.Creating the Application on Facebook
In order to successfully make calls to Facebook, you have to first register your application with Facebook and obtain authentication keys to be used with OAuth 2.0.1. Go to http://developers.facebook.com/setup/ to begin registering your application. Make sure you use Internet Explorer. I ran into problems when attempting to register using Firefox (application would register, but a blank page was displayed).
2. Register the application using a site name and URL of the path relative to your authenticating logic. The redirect_url parameter you provide to the Facebook Graph API needs to match the path used to register the application.

In this example, I’ve registered the application as:
Site Name: Dave Test
Site URL: http://localhost/Facebook/oauth/
3. Once registered, you can view your application’s configuration settings and authentication keys. These details will be referenced in the example code to make requests to Facebook.

Coding the Application
To accomplish the task of pulling my Facebook profile and friends list, I need to do the following:- Redirect from my local web application to Facebook with my application id and URL of my redirect handler
- Construct the redirect URL handler to accept the access token provided by Facebook
- Instantiate the FacebookAPI object with the access token above
- Access my Profile via the FacebookAPI
We need to send Facebook our application id and URL of the handler for Facebook’s redirect, containing our access token.
Notice that the variable clientId matches the field Application Id in my Facebook Application configuration settings and the relative path in the variable redirectUrl matches the path defined in the field Connect URL.protected void btnAuthenticate_Click(object sender, EventArgs e){string clientId = "117342178314989";string redirectUrl = "http://localhost/Facebook/oauth/oauth-redirect.aspx";Response.Redirect(string.Format("https://graph.facebook.com/oauth/authorize?client_id={0}&redirect_uri={1}", clientId, redirectUrl));}
After redirecting, a response is sent back to http://localhost/Facebook/oauth/oauth-redirect.aspx containing a code in the query string parameters of the URL. Successfully making a call, results in the following URL:
http://localhost/Facebook/oauth/oauth-redirect.aspx?code=2.UwNcNB5FfO69d_l5S1j76Q__.3600.1280984400-1427490881%7CGE2JRQaeMDwAZHwZMkk0NUiMQD4.Notice the parameter code. This value will be used to request an access token from Facebook’s Graph API.
2. Building the Handler for Facebook’s Redirect
In step 1, we’ve created the request to Facebook. In step 2, we need to build the handler to accept the access token provided by Facebook to successfully make API calls.
Currently, there’s nothing built into the API that requests the access token, so I had to build one. The code below calls the Facebook Graph API, requesting an access token.
Variables clientId and clientSecret should match fields Application Id and Application Secret, respectively, in the Facebook Application Settings page.private Dictionary<string, string> GetOauthTokens(string code){Dictionary<string, string> tokens = new Dictionary<string, string>();string clientId = "117342178314989";string redirectUrl = "http://localhost/Facebook/oauth/oauth-redirect.aspx";string clientSecret = "bc7996cfc4f0c66d0417b54eea73f4e7";string scope = "read_friendlists,user_status";string url = string.Format("https://graph.facebook.com/oauth/access_token?client_id={0}&redirect_uri={1}&client_secret={2}&code={3}&scope={4}",clientId, redirectUrl, clientSecret, code, scope);HttpWebRequest request = WebRequest.Create(url) as HttpWebRequest;using (HttpWebResponse response = request.GetResponse() as HttpWebResponse){StreamReader reader = new StreamReader(response.GetResponseStream());string retVal = reader.ReadToEnd();foreach (string token in retVal.Split('&')){tokens.Add(token.Substring(0, token.IndexOf("=")),token.Substring(token.IndexOf("=") + 1, token.Length - token.IndexOf("=") - 1));}}return tokens;}
Scope defines the scope of the request. These values are considered Extended Permissions which means requesting access to data not marked as public to everyone in a user’s Facebook profile.
3. Instantiate FacebookAPI with an Access Token
The method GetOauthTokens accepts a parameter code. We’ll pass in the code value obtained in the query string param of the response in step 1 and cache the response for the time defined by the expiration value in Facebook’s Graph API response.
4. Access My Facebook Profileprotected void Page_Load(object sender, EventArgs e){if (Request.Params["code"] != null){Facebook.FacebookAPI api = new Facebook.FacebookAPI(GetAccessToken());...}}private string GetAccessToken(){if (HttpRuntime.Cache["access_token"] == null){Dictionary<string, string> args = GetOauthTokens(Request.Params["code"]);HttpRuntime.Cache.Insert("access_token", args["access_token"], null, DateTime.Now.AddMinutes(Convert.ToDouble(args["expires"])), TimeSpan.Zero);}return HttpRuntime.Cache["access_token"].ToString();}
Now that we have an active connection with Facebook, we can use the API in step 3 to request my profile information. Doing so is as easy as a few lines of code:
making Get requests to Facebook via the API returns JSON containing profile information. The first requests my profile while the second obtains my friends list.JSONObject me = api.Get("/me");JSONObject meFriends = api.Get("/me/friends");
Placing a watch on these objects gives us

 As you can see, the variable me contains all of my public profile attributes. The variable meFriends has all 188 of my friends in an array of dictionary items. Each friend is stored in an id/name combo. If we wanted, we could take this another level deeper and get all friends profiles by requesting the id via the Graph API like so (1427490881 is my Facebook id):
JSONObject me = api.Get("/1427490881");
Full Source
/Default.aspx.cs
using System;using System.Collections;using System.Configuration;using System.Data;using System.Linq;using System.Web;using System.Web.Security;using System.Web.UI;using System.Web.UI.HtmlControls;using System.Web.UI.WebControls;using System.Web.UI.WebControls.WebParts;using System.Xml.Linq;namespace Facebook{public partial class _Default : System.Web.UI.Page{protected void btnAuthenticate_Click(object sender, EventArgs e){string clientId = "117342178314989";string redirectUrl = "http://localhost/Facebook/oauth/oauth-redirect.aspx";Response.Redirect(string.Format("https://graph.facebook.com/oauth/authorize?client_id={0}&redirect_uri={1}", clientId, redirectUrl));}}}
/oauth/oauth-redirect.aspx.cs
using System;using System.Collections;using System.Configuration;using System.Data;using System.Linq;using System.Web;using System.Web.Security;using System.Web.UI;using System.Web.UI.HtmlControls;using System.Web.UI.WebControls;using System.Web.UI.WebControls.WebParts;using System.Xml.Linq;using Facebook;using System.IO;using System.Net;using System.Collections.Generic;namespace Facebook{public partial class oauth_redirect : System.Web.UI.Page{protected void Page_Load(object sender, EventArgs e){if (Request.Params["code"] != null){Facebook.FacebookAPI api = new Facebook.FacebookAPI(GetAccessToken());JSONObject me = api.Get("/me");JSONObject meFriends = api.Get("/me/friends");}}private string GetAccessToken(){if (HttpRuntime.Cache["access_token"] == null){Dictionary<string, string> args = GetOauthTokens(Request.Params["code"]);HttpRuntime.Cache.Insert("access_token", args["access_token"], null, DateTime.Now.AddMinutes(Convert.ToDouble(args["expires"])), TimeSpan.Zero);}return HttpRuntime.Cache["access_token"].ToString();}private Dictionary<string, string> GetOauthTokens(string code){Dictionary<string, string> tokens = new Dictionary<string, string>();string clientId = "117342178314989";string redirectUrl = "http://localhost/Facebook/oauth/oauth-redirect.aspx";string clientSecret = "bc7996cfc4f0c66d0417b54eea73f4e7";string scope = "read_friendlists,user_status";string url = string.Format("https://graph.facebook.com/oauth/access_token?client_id={0}&redirect_uri={1}&client_secret={2}&code={3}&scope={4}",clientId, redirectUrl, clientSecret, code, scope);HttpWebRequest request = WebRequest.Create(url) as HttpWebRequest;using (HttpWebResponse response = request.GetResponse() as HttpWebResponse){StreamReader reader = new StreamReader(response.GetResponseStream());string retVal = reader.ReadToEnd();foreach (string token in retVal.Split('&')){tokens.Add(token.Substring(0, token.IndexOf("=")),token.Substring(token.IndexOf("=") + 1, token.Length - token.IndexOf("=") - 1));}}return tokens;}}}

